
Welcome to MorphWiz Studio
MorphWiz Studio is a spectral audio morphing synthesizer. Up to four sources (samples) can be combined to construct hybrid sounds. The resulting sound is a smooth transition in the timbre, for instance, a sound that starts as a trumpet and gradually changes into a cello. MorphWiz Studio includes an analyzer to incorporate your own samples, in addition to a vast array of synthesizer features. These include an arpeggiator, modulation matrix, four envelopes, up to four LFOs with complex curves, a morphable resonant filter, and an effects section.
MorphWiz Studio for iOS includes a multi-touch performance playing surface. As with a fretless stringed instrument, such as a violin, the playing surface enables precise control of the pitch and character of each synthesizer voice. The synthesizer engine is compatible with MIDI Polyphonic Expression (MPE). ## System requirements
Known Issues
System Requirements
iPad
- iPadOS 12.0 or later
- Recommended minimum device: iPad 6th Generation (2018)
macOS
- macOS High Sierra (version 10.13) or later
- Intel® Core™ i5 (2018 or later) or Apple silicon
- CPU cores: 4 or more
- RAM minimum: 8GB
- Hard disk free space: 1GB
- Display resolution: 1440x900 or higher
- Graphics: Graphics card with Metal support
Windows
- Windows 10 22H2 or later
- Intel Core™ i5 or AMD Ryzen
- CPU cores: 4 or more
- RAM minimum: 8GB
- Hard disk free space: 1GB
- Display resolution: 1440x900 or higher
- Graphics: AMD R or RX series and later or NVIDIA Series 700 and later
File locations
You can find MorphWiz Studio files in the following default locations:
iOS
- Shared Presets
/iCloud Drive/MorphWiz 2/Wizdom/MorphWiz Studio/presets/presets - Shared Sample Data
/iCloud Drive/MorphWiz 2/Wizdom/MorphWiz Studio/presets/sources - Local Presets
/On My iPad/MorphWiz 2/Wizdom/MorphWiz Studio/presets - Local Sample Data
/On My iPad/MorphWiz 2/Wizdom/MorphWiz Studio/sources
macOS
- Presets
~/Music/Wizdom/MorphWiz Studio/presets - User Presets
/iCloud Drive/Wizdom/MorphWiz Studio/presets - Sample Data
~/Music/Wizdom/MorphWiz Studio/sources - User Sample Data
/iCloud Drive/Wizdom/MorphWiz Studio/sources - Application Preferences
~/Library/Application Support/MorphWiz Studio.settings
Windows (contact us for a beta)
- Standalone application
C:\ProgramData\Wizdom\Program\MorphWiz Studio.exe - VST3
C:\Program Files\Common Files\VST3\MorphWiz Studio.vst3 - Presets
C:\ProgramData\Wizdom\Resources\MorphWiz Studio\presets - User Presets
C:\Users\\AppData\Roaming\Wizdom\MorphWiz Studio\presets - Sample Data
C:\ProgramData\Wizdom\Resources\MorphWiz Studio\sources - User Sample Data
C:\Users\\AppData\Roaming\Wizdom\MorphWiz Studio\sources - Application Preferences
C:\Users\\AppData\Roaming\MorphWiz Studio\MorphWiz Studio.settings
Acknowledgements
Concept by Jordan Rudess
Design and Programming by Peter Johnson
Spectral Audio Morphing based on SpectMorph by Stefan Westerfeld
AlephOne Fretless by Robert Fielding
Mist Reverb based on Mutable Instruments Clouds / Parasites by Emilie Gillet and Matthias Puech
Samples provided by:
- Kurt Ader & Pete Jung KApro
- Jimmy T
- BT
- Jordan Rudess
- Carl Helder
- Peter Johnson
Presets designed by
Copyright ©2025 One Red Dog Media Pty Ltd.
In association with Wizdom Music Inc.
All artwork, presets, and audio samples are proprietary to One Red Dog Media Pty
Ltd.
All rights reserved
Open-Source Licences
SpectMorph (Modified Version)
This application incorporates a modified version of SpectMorph, originally developed by Stefan Westerfeld and released under the GNU Lesser General Public License version 2.1 or later (LGPL‑2.1‑or‑later). SpectMorph enables analysis, synthesis, and morphing of audio signals using advanced spectral modelling techniques.
| Project Homepage | https://www.spectmorph.org/ |
| Original Author | Stefan Westerfeld |
Modifications
This application uses a cut‑down or partially modified version of SpectMorph to integrate with our proprietary audio engine. All modifications to SpectMorph are released as required under the LGPL‑2.1 and are publicly available.
| Modified Source Code (LGPL‑2.1‑or‑later) | https://github.com/onereddogmedia/MorphKit |
Your Rights Under the LGPL‑2.1‑or‑later
Under the terms of the LGPL‑2.1‑or‑later, you have the right to:
- Access the source code of the SpectMorph‑derived components
- Modify those components
- Rebuild and redistribute them under the LGPL‑2.1
Note: Only the SpectMorph‑derived components are subject to these rights. All other parts of this application — including the user interface, DSP engine, presets, assets, and all proprietary code — remain the exclusive property of One Red Dog Media Pty Ltd.
Licence Text
A full copy of the LGPL‑2.1 licence is included with this application and may be accessed at: https://www.gnu.org/licenses/old-licenses/lgpl-2.1.html
Additional Third‑Party Components (within SpectMorph)
The SpectMorph library also includes the following third‑party files:
pffft — Pretty Fast FFT
| Author | Julien Pommier, based on FFTPACKv4 by Dr Paul Swarztrauber (NCAR) |
| Copyright | © 2013 Julien Pommier; © 2004 UCAR |
| Licence | FFTPACK/UCAR permissive licence (BSD‑style) — see
pffft.h
|
SMPcg32rng.h / SMMathArm.h
| Author | Tim Janik |
| Copyright | © 2014 Tim Janik |
| Licence | Mozilla Public License 2.0 (MPL‑2.0) |
| Licence Text | https://mozilla.org/MPL/2.0 |
Proprietary Components
All code and assets not derived from SpectMorph are proprietary:
© 2021–2026 One Red Dog Media Pty Ltd. All rights reserved. These components are not covered by any open‑source licence.
Overview
MorphWiz Studio is an easy-to-use, yet powerful sample based synthesizer that offers considerable expressive control over the character of the sound or timbre.
MorphWiz Studio features a spectral audio morphing synthesizer engine. You can import and analyzer samples to be manipulated using the morphing engine. Samples may be edited to adjust start/end, loop points, and pitch. Once encoded and saved samples can be used as Sources and incorporated to create new instruments. The real-time spectral audio morphing smoothly transitions from one Source to the next, without using cross-fades. The engine supports up to four Sources.
To design new sounds with MorphWiz Studio you need to understand how its parts are combined together, and they contribute to what you hear.
The diagram below shows signal flow from left to right through the different sound generating and processing modules.
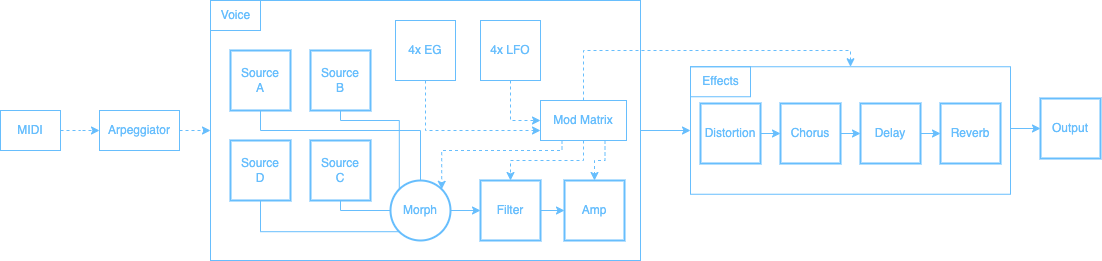
There are three basic stages:
-
Each sound can contain up to four Sources: A, B, C, and D. Each Source consists of a single sample. These Sources are used to create the basic tone of the sound. Sources are mixed through the morphing engine and processed by a single morphable filter and amplifier. All modulation in this section applies per voice.
-
The filter is a single morphable filter with cutoff and resonance controls. The multi-mode allows the filter mode to be smoothly adjusted from low-pass, through notch, to high-pass. The filter slope may be either 12dB/octave or 24dB/octave. A band-pass mode is also available. All modulation in this section applies per voice.
-
After each individual voice is mixed together, they pass through the effects stage. Any modulation of the Effects section is applied to the entire audio signal. Effect modulation is applied from the most recently active voice.
Sounds may be saved into Presets and collected into Banks. The Preset Browser is used to manage the presets. The Sources Manager may also be used to organize the available sample sources.
iOS and macOS only
iOS and macOS supports sharing Presets and Sources with iCloud Drive
Interface overview
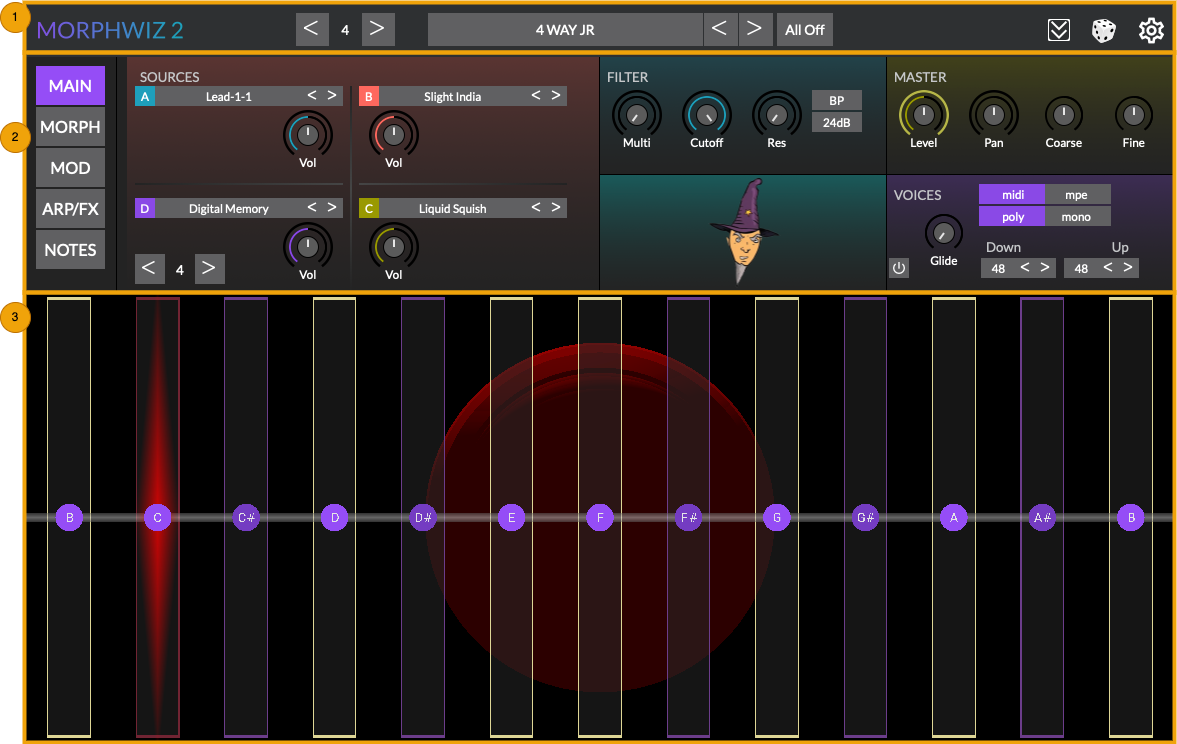
The MorphWiz Studio user interface is arranged into three sections as shown in the screenshot below.
Standalone app interface
The standalone app interface includes the isomorphic playing surface.
Plugin interface
The plugin interface (when running as an AU/VST) is a compressed version of the interface without the isomorphic playing surface. On iOS the AUv3 interface will appear the same as the standalone app.
Name bar
The Name bar provides functions for preset management and accessing global settings. The bar is always present.

Octave (1)
Standalone app only>
Change the current octave of the isomorphic playing surface.
Preset Name (2)
Shows the name of the current preset. Tapping or clicking on this area opens the Preset browser of available presets that can then be loaded into the synthesizer.
Next Preset Buttons (3)
The left and right arrows load the previous and next preset in the bank.
All Off (4)
In the event of a stuck MIDI note this button will turn off all playing sound.
Expand (5)
Standalone app only
The size of the Parameter editor section can be expanded. This button rotates through 3 size settings: no Parameter editor, show the Parameter editor, show the larger Parameter editor.
Random (6)
Randomize the Sources used in the current preset.
Settings (7)
Standalone app only
Configure the audio and MIDI interfaces used by the application, access the online help.
Parameter editors
The Parameter editor section contains the editable synthesizer parameters and the preset browser. The left hand side of the Parameter editor contains a menu from which additional pages of parameters may be accessed.
MAIN
The main synthesizer parameters, including Source selection, filter, voice configuration and master controls.
MORPH
The morph parameters allow for the selection of the four sound sources. The X-Y performance pad controls the real-time manipulation of the spectral morphing.
SOURCES
The Sample Editor to load your own sound samples, edit, and encode the sound ready to be used by the synthesizer engine.
MOD
The modulation matrix is used to assign modulation sources to destination parameters. This includes low frequency oscillators (LFO) and envelope generators along with a range of input parameters from the playing surface or via external MIDI.
ARP/FX
The arpeggiator and master effects section. The effects include Distortion, Chorus, Delay and Reverb.
NOTES
Standalone app only
Configuration for the isomorphic playing surface. The musical scale may be selected along with parameters that effect the behavior of the playing surface. In addition, there are controls for voice management, pitch bend, and master volume.
Isomorphic playing surface
Standalone app only
The Isomorphic playing surface is the area that contains the notes and expression input to the synthesizer, and is where you play the instrument. It occupies the bottom section of the user interface.
The notes are arranged similarly to a stringed instrument, for example, a guitar. Each note occupies the vertical column (or fret) with lower pitch on the left, higher pitch on the right.
Horizontally, each row of notes represents a string, with the lowest pitch in the bottom left and the highest in the top right. There are a maximum of six strings. Notes are arranged in 4ths.
The playing surface is fretless in that it is possible to seamlessly slide the pitch of the a note, as you would by sliding along a guitar string. The accuracy of the note selection can be adjusted such that the initial touch is rounded to the nearest note. By adjusting this accuracy the instrument can become fully fretless in the same way that a violin is fretless. The pitch of the note is then dependent upon the skill of the musician.
In addition, sliding vertically up and down along the fret column can adjust the timbre of the note via the morphing synthesizer engine.
Preset browser
The Preset browser is used for loading and sharing presets.
There are two different views for the Preset browser results list.
-
Browser view: Tap or click the Browse button to open browser view.
-
Name bar list: Tap or click the preset field in the Name bar to display a list of presets.
Browser list parameters
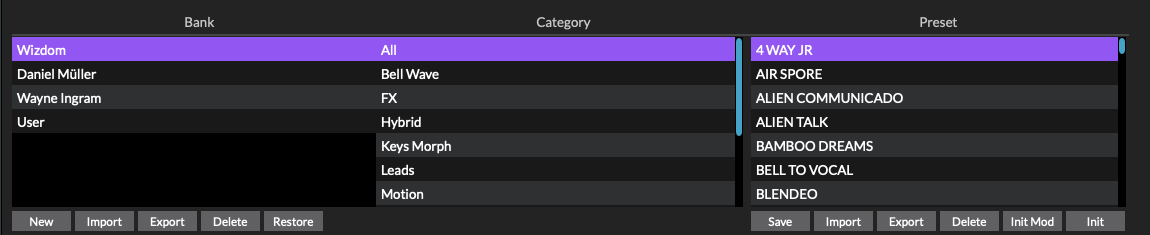
The Browser is split into three columns: bank, category and preset. A bank contains any number of presets sorted by category.
Bank
Banks are sorted alphabetically with the factory bank listed first. Simply tap or click a bank name to change the current bank and show the list of associated presets. Each bank is a folder saved within the operating system’s disc file system.
-
New: Create a new preset bank.
-
Import: Import a preset bank and save it into the local list.
-
Export: Export a user created present bank to an external file.
-
Delete: To delete a user created bank.
-
Restore: This will restore the default factory bank to initial values.
Delete and Restore
Any changes will be lost and cannot be undone.
Category
The categories are a predefined list of types. Simply tap or click a category name to change the category and show the list of associated presets. Each category is a sub-folder saved within the bank folder.
Preset
Presets are sorted alphabetically. Simply tap or click a preset name to the load preset. The current preset will be replaced and any changes will be overwritten. Each preset is a file saved within the operating system’s disc file system.
-
Save: Save the current preset.
-
Import: Import a preset.
-
Export: Export the selected preset.
-
Delete: To delete a preset.
-
Init Mod: Initialize the modulation matrix to the default settings.
-
Init: Load the default preset.
Delete
Any changes will be lost and cannot be undone.
Init Mod
Initialize the modulation matrix to default values overwriting any current settings.
Init
Initialize the synthesizer to the default patch, a good starting point to create your own presets.
Sound sources
The sources section describes which sound samples are assigned to each of the four Sources. A Source is similar to an oscillator or tone generator in an analog synthesizer. Each Source consists of a single sample and that sample may include a start, end, and loop point. Multi-samples and velocity layered samples are not supported. However, do not let that distract from the power of the spectral morphing engine. Sample playback reconstructs the partials from the encoded sound sample. Such additive resynthesis is able to provide accurate sample playback across the frequency spectrum.
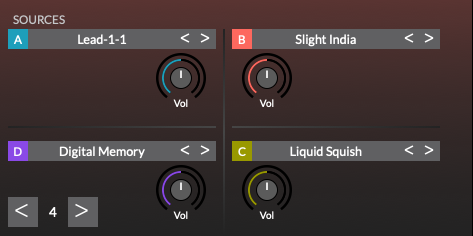
Sources controls
-
Source A/B/C/D: Click or tap the Source name to show the “sources_editor”. A new sound source may be loaded into the selected slot, an existing sound may be edited, or a new sound created (sampled).
-
Solo A/B/C/D: Click or tap the Source letter to turn solo mode on or off for that sound source, allowing you to hear it by itself.
-
Next/Previous: Load the previous or next source (arrows right of the Source name).
-
Vol A/B/C/D: Adjust the individual output level of the sound source. The area left of the Vol knob provides a visual representation of the Source shape or waveform. This oscilloscope shows properties of the wave, such as amplitude or frequency.
Standalone app only
Octave: Change the current octave of the isomorphic playing surface. Under Source D. Duplicated from the Name bar.
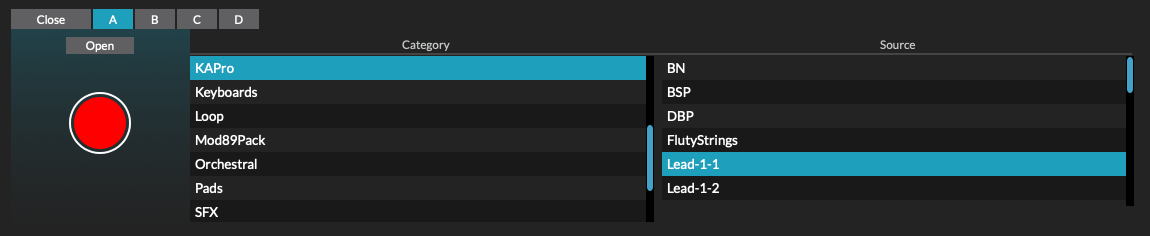
Sources manager
The Sources editor is shown when the Source name is selected from the Sound sources panel.
-
Close: Closes the Sources editor.
-
A/B/C/D: Selects the Source slot into which the selected sound will be loaded.
-
Open: Load an audio file sample. Most popular files types are supported such as WAV, AIFF, MP3, Ogg, FLAC, and AAC. Stereo files are converted to mono upon load. The maximum length of the audio file is 30 seconds.
-
Record: Record the audio input and create a new sample.
Audio Input
The audio settings must support an audio interface with input, for example, a microphone.
When running as plugin audio input is available if the plugin is loaded as an audio effect.
User sources
Sources within the User category may be imported, deleted, exported, or edited.
-
Rename: Delete the selected user source.
-
Delete: To delete the selected source.
-
Import: Import a new user source.
-
Export: Export a user source.
-
Edit: Edit a user source using the Sources sampler
Sources sampler
The sampler records audio and encodes the recording into a format that the synthesizer can playback. There are a number of a parameters to control the analysis of the audio sample.
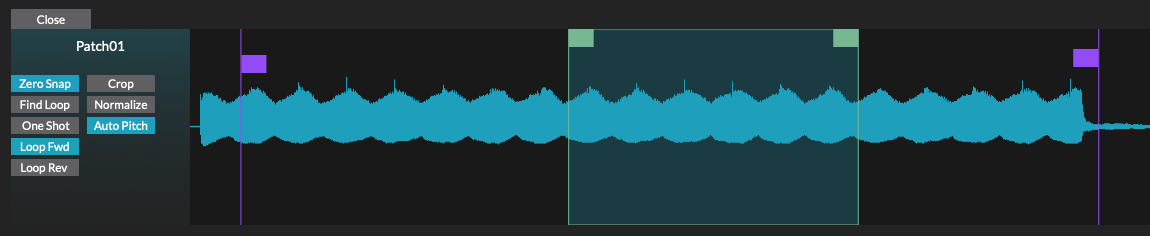
- Close: Close the waveform editor
Source analysis parameters
Encoding of the sample ready for use by the synthesizer engine happens in the background. Samples have to be encoded before they can be loaded as Sources. An activity spinner in the bottom left of the waveform editor shows when background encoding is in progress.
-
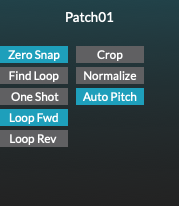
Zero Snap: When enabled, the sample markers are snapped to zero crossings while dragging their locations.
-
Find Loop: Attempt to find a loop within the sample. If no loop is detected, the nearest zero crossing points to the loop markers are chosen.
-
One Shot: The sample will play through to the end then stop.
-
Crop: Remove the left side up until the start marker and the right side from the end marker, and save a new sample.
-
Normalize: Normalize the volume for the sample.
-
Auto Pitch: Auto-tune the sample to the middle-C (C3).
Looping
MorphWiz Studio does not require you to define exact loop points. The spectral resynthesizer only needs approximately correct loop points to avoid audio clicks. This is different to traditional samplers that replay the original sample data and require perfect loop points or cross-fades.
Dictate the type of looping of the sustained section. When on, the sample will have a looping sustain section.
-
Loop Fwd: The sustained loop section is played forward, when the end of the loop is reached playback jumps back to the start of the loop.
-
Loop Rev: The sustained loop section is played forward to the end of the loop, then in reverse back to the start of the loop.
Waveform editor
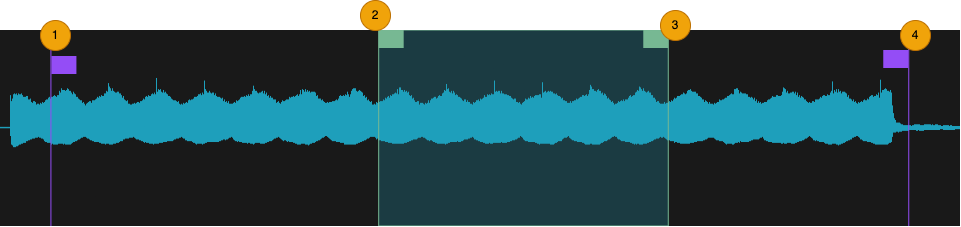
The waveform display of the audio associated with the currently loaded audio sample file.
The vertical purple lines displayed over the waveform indicate playback start and end points. Drag handle right or left to trim unwanted audio playback from the start or the end of the sound. The green section shows the looped portion of the audio, when Loop Fwd or Loop Rev is enabled.
Tap or click and hold to hear a preview on the originally recorded audio.
-
Start marker (1)
-
Loop Start marker (2)
-
Loop End marker (3)
-
End Marker (4)
Sources sampler
The sampler records audio and encodes the recording into a format that the synthesizer can playback. There are a number of a parameters to control the analysis of the audio sample.
- Close: Close the waveform editor
Source analysis parameters
Encoding of the sample ready for use by the synthesizer engine happens in the background. Samples have to be encoded before they can be loaded as Sources. An activity spinner in the bottom left of the waveform editor shows when background encoding is in progress.
-
Zero Snap: When enabled, the sample markers are snapped to zero crossings while dragging their locations.
-
Find Loop: Attempt to find a loop within the sample. If no loop is detected, the nearest zero crossing points to the loop markers are chosen.
-
One Shot: The sample will play through to the end then stop.
-
Crop: Remove the left side up until the start marker and the right side from the end marker, and save a new sample.
-
Normalize: Normalize the volume for the sample.
-
Auto Pitch: Auto-tune the sample to the middle-C (C3).
Looping
MorphWiz Studio does not require you to define exact loop points. The spectral resynthesizer only needs approximately correct loop points to avoid audio clicks. This is different to traditional samplers that replay the original sample data and require perfect loop points or cross-fades.
Dictate the type of looping of the sustained section. When on, the sample will have a looping sustain section.
-
Loop Fwd: The sustained loop section is played forward, when the end of the loop is reached playback jumps back to the start of the loop.
-
Loop Rev: The sustained loop section is played forward to the end of the loop, then in reverse back to the start of the loop.
Waveform editor
The waveform display of the audio associated with the currently loaded audio sample file.
The vertical purple lines displayed over the waveform indicate playback start and end points. Drag handle right or left to trim unwanted audio playback from the start or the end of the sound. The green section shows the looped portion of the audio, when Loop Fwd or Loop Rev is enabled.
Tap or click and hold to hear a preview on the originally recorded audio.
-
Start marker (1)
-
Loop Start marker (2)
-
Loop End marker (3)
-
End Marker (4)
Filter
The filter is a zero delay feedback multi-mode filter with resonance and moprhable mode. It’s a state variable filter which can simultaneously produce several filter responses (Low Pass, High Pass, Band Pass and Band Reject or Notch).
The filter mode may be varied continuously from Low Pass, to Notch, to High Pass. The filter cuts frequencies above or below the cutoff point (depending if it’s configured to Low Pass or High Pass) or a range band (if it’s configured for Notch, also known as Band Reject).
The filter is switchable to have either 2-pole (12dB/oct) or a 4-pole (24dB/oct) slope.
The filter design is inspired by the classic Oberheim ®SEM filter.
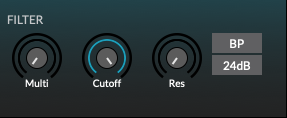
The output from all four sources is sent to the filter at levels determined by independent controls in each source.
Filter parameters
-
Multi: Filter Mode. Low Pass when the knob points to the lowest point on the left. Notch is in the centre position. High pass when the knob points fully to the right.
-
Cutoff: Base cutoff frequency. Unlike what happens in a Low Pass filter, this frequency will have different actions according to the selected filter mode. If the filter mode is set, to High Pass, and the cutoff frequency is set very high, we will hardly have any sound (only the frequencies above the cutoff point will pass without attenuation). If we have the filter at the Notch point (center) we will have just a narrow band cutoff. If we choose Band Pass (have the Mode knob at the switched BP position) then we will only have a narrow band of frequencies around the cutoff point audible.
-
Resonance: Boost the frequencies around the cutoff point, creating a boosting peak bell around that point.
-
BP: Enable band pass mode. This is like the Notch inverted, which means that all frequencies are cut except for a narrow range, with the peak at the cutoff point. The filter lets pass only this range (band) of frequencies.
-
24dB: When on enable a 4-pole (24dB/oct) slope, otherwise 2-pole (12dB/oct) slope.
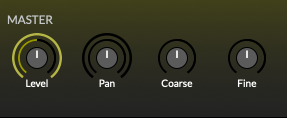
Master Voice
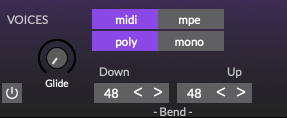
The master voice section provides high-level control over various attributes of a preset such as polyphony, pitch bend, and glide.
Master parameters
-
Level: Adjust the final level of the output.
-
Pan: Adjust the stereo position of the final output.
-
Coarse: Adjust the tuning in semitones.
-
Fine: Adjust the tuning in cents.
Voice parameters
-
MIDI: Enable conventional MIDI input processing. For use with the isomorphic playing surface and external MIDI keyboard controllers. The synthesizer plays all MIDI data received on all 16 MIDI channels, as per MIDI Omni Mode 1. However, the syntheszier adheres to per channel control change messages, as per MIDI Omni Mode 4. In other words, a note received on channel 1 will be effected by a control change message on channel 1. While a note on channel 2 will be effected by a control change message on channel 2. Both notes may play polyphonically and control changes occur independently. Likewise, if both notes were received on channel 1 and the control change message was also received on channel 1, the controller will effect both playing notes.
-
MPE: Enable MIDI Polyphonic Expression input processing. A Lower Zone is assigned with channel 1 as the Master Channel and one or more Member Channels allocated increasing from channel 2.
-
Poly/Mono: Toggle between polyphonic and monophonic voice modes. The maximum polyphony is 16 voices.
-
Glide: Set the portamento rate or time. Glide causes slides from one note pitch to the next. This parameter can be enabled or disabled by the toggle button next to the knob.
-
Pitch bend Down/Up: Sets the maximum range for upward and downward pitch bend modulation, typically performed with your keyboard pitch wheel or by sliding your finger across the isomorphic playing surface.
Note
When in MIDI mode both the pitch bend down and up ranges may be set. In MPE mode the pitch bend range is the equivalent of pitch bend down. For best results use a pitch bend down/up range of 48 with the isomorphic playing surface (iOS). When changing bend range and MIDI mode, ensure that both pitch bend down up ranges are set to 48 when returning to the isomorphic playing surface. While using an external keyboard controller it is necessary to match the pitch bend down/up range to that set within the external controller.
Note
When in Mono mode the isomorphic playing surface will also behave monophonically. This may cause an unexpected behaviour in the Arpgeggiator as played notes are not stacked. Therefore it is recommended to use Poly mode when using the Arpgeggiator. This does not apply when using external MIDI keyboards.
Legato
When Mono is selected, an option is available to enable legato mode on the envelop generators. Playing of new notes while an existing note is held will not trigger the attack phase of the enveloper generator.
Morph controls
The morph controls determine how the four Sources are combined to produce a new timbre. It is shown when MORPH is selected on the Parameter menu. There are four basic types of interaction.
-
XY: All four Sources are active and the X and Y knobs control the morph between them.
-
Linear: All four Source are active and the Y knob controls the morph between them.
-
2: Only Sources A and D are active and the Y knob controls the morph between them.
-
Single: Only Source D is active and therefore there is no morphing of Sources.
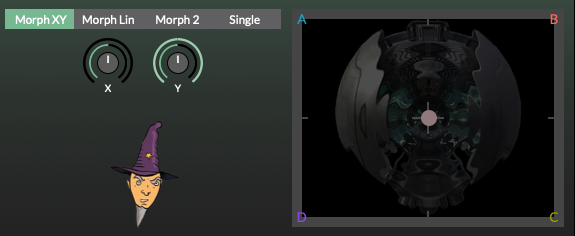
Morph parameters
-
X: Sets the amount of morphing modulation along the X-axis.
-
Y: Sets the amount of morphing modulation along the Y-axis.
-
XY Pad: Drag the handle modulate the two X and Y parameters simultaneously. In Linear modes the handle modulates only the Y parameter.
-
Wizard: The Wizard shows the real-time oscilloscope and frequency spectrum of each Voice, prior to the Effects section.
Modulation Matrix
The modulation matrix is shown when MOD is selected on the Parameter menu. The matrix connects modulation sources to synthesizer parameter destinations.
The modulation sources comprise of four envelope generators in ADSR configuration, four low frequency oscillators, a random noise generator, and thirteen MIDI sources. These sources are arranged in a modulation rack and each source is processed by an appropriate modulation curve.
Almost every knob in the MorphWiz Studio interface is a modulation destination, representing a parameter that can be modulated by as many as five modulators. This not only includes voice parameters, but also effects and the arpeggiator; even other modulation parameters can be modulation destinations. Each mod rack entry may have its own intensity (amount it affects the destination).
Modulation rack

Destination
Tap or click the top section of the modulation source, where the name is written, to show the modulation rack destinations.
To assign a destination, click or tap menu “Add Dest” and select the destination. Up to five destinations may be added to the rack. To return to the mod track, click or tap the Close button.

Each destination has the following parameters
-
Intensity: The amount of modulation applied to the destination.
-
Power button: Enable or disable the source modulation applied to the destination.
-
Close button: Removes the destination.
Curve
Tap or click the bottom section of the modulation source, to show the modulation curve for the source. As shown in the image below, complex modulation curves may be created by adding additional control points. Double tap or click the curve to add additional control points. Double tapping or clicking an existing control point will delete that point. The curvature is adjustable by dragging the section of the curve between two control points. Straight lines may be bent to form smooth waves.
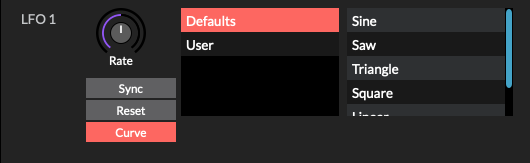
Low Frequency Oscillators (LFO)
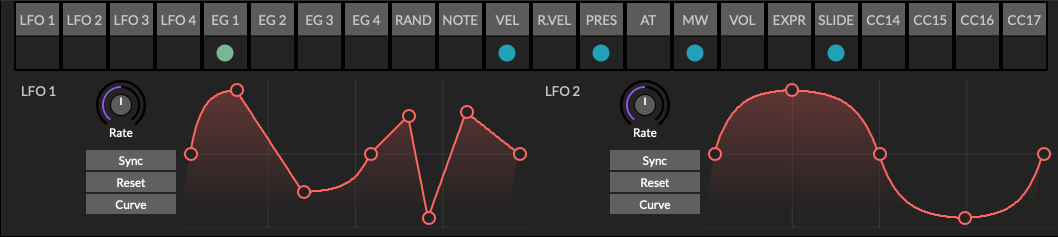
-
Rate: The frequency of the oscillator.
-
Sync: Sync the rate of the LFO to the host clock.
-
Reset: Reset the LFO when a new note is received.
-
Curve: A collection of preset and user saveable waveforms.
Envelope Generators (EG)
There are four envelope generators (colored light green). These follow the classic Attack Decay Sustain Release (ADSR) shape.
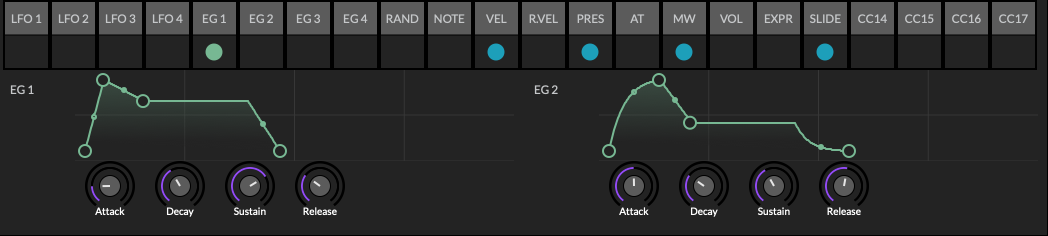
Drag the circular handles on the curve to adjust slope. Or use the knobs below the curve. The curvature of the Attack, Decay and Release slopes may be modified by dragging the smaller handle in the middle of the line. Thus adjusting the slope from linear to exponential. Additional control points cannot be added.
If :ref:legato mode is enabled, each envelope will not
drop to zero in the event of a retrigger while the envelope is active -
instead, the envelope ramps to the new amplitude over the attack
period.
External sources
External modulation sources include those coming from MIDI continuous controller (CC) messages, along with a random noise generator. The MIDI sources have been chosen from the most commonly used controllers and those of the MPE specification, they are:
| External Source | MIDI Value |
|---|---|
| NOTE | Note On |
| VEL | Note On velocity |
| R.VEL | Note Off velocity |
| AT | Aftertouch MIDI 0xA0 |
| MW | Mod Wheel CC#1 |
| VOL | Volume CC#7 |
| EXPR | Expression CC#11 |
| Slide | Brightness CC#74 |
| CC14 | CC#14 |
| CC15 | CC#15 |
| CC16 | CC#16 |
| CC17 | CC#17 |
In addition the synthesizer responds to program change, sustain pedal, pitch bend range, and GeoSynth note-tie messages.
Note
Envelope Generator 1 (EG1) and VEL (Note On velocity) are hard-coded to the VCA Amp level.
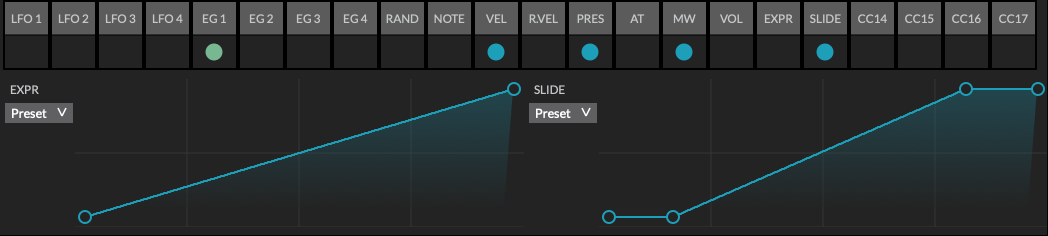
- Preset: A collection of preset waveforms (linear, stepped).
Random generator
-
Rate: The frequency at which the random waveform is generated.
-
Sync: Sync the rate of the random generator to the host clock.
Initialize Modulaton Matrix
The modulation matrix may be reset to a default state via the Init Mod button on the [Preset browser]
Effects
The effects rack is shown when FX is selected on the Parameter menu. The effects rack contains three sub-sections: the arpeggiator, FX1, and FX2. Each of the FX sub-sections contain two effects. These are Distortion and Chorus on FX1, and Delay and Reverb on FX2.
The effects are applied to the signal path after all the voices are mixed and before the final output. Signal flow is linear through each effect, like a chain of guitar effect pedals, flowing: Distortion, Chorus, Delay, Reverb. Each effect may be individually enabled and mixed with the dry signal.
Certain parameters in the effects rack may also be modulated by the modulation matrix. As the modulation matrix is per voice, the most recently active voice’s modulation matrix is used to modulate the effect parameters.
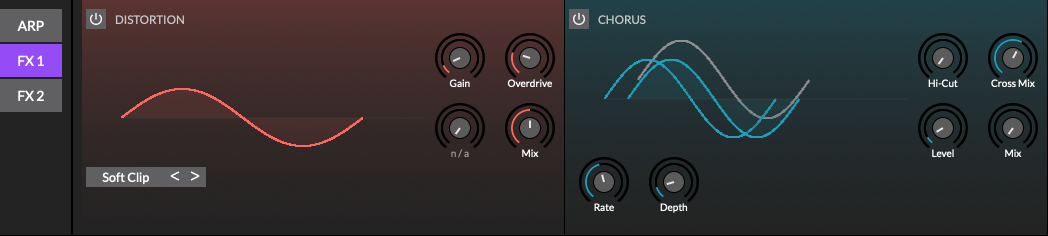
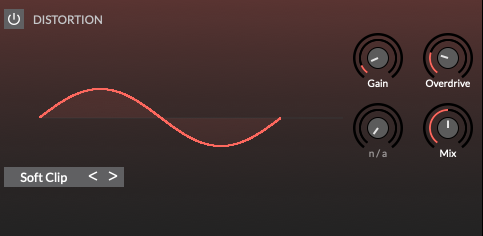
Distortion
Distortion effect with multiple algorithms including overdrive, bitcrusher and waveshaping.
-
Enable: Bypass the effect on and off.
-
Type: Select the algorithm type.
-
Gain: Set the amount of input gain applied before the distortion effect. This enables you to produce heavily saturated distortions with some distortion types.
-
Overdrive: Overdrive amount. The precise effect varies with each distortion algorithm.
-
Sat: Set the amount of bit saturation (Bit Saturator algorithm only).
-
Mix: Determine the wet/dry balance (0% = dry only; 50% = equal mix; 100% = wet only).
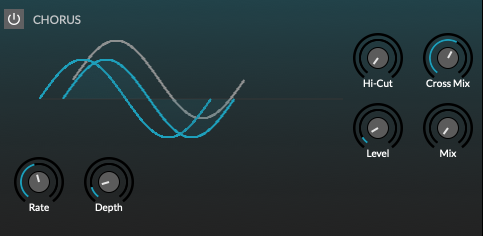
Chorus
Stereo chorus with varying degrees of spacial dimension.
-
Enable: Bypass the effect on and off.
-
Rate: Set the modulation speed.
-
Depth: Set the modulation intensity.
-
Hi-Cut: high-pass filter cutoff frequency.
-
Cross Mix: Mix the dimension cross beams
-
Level: Set the level of the modulated signal.
-
Mix: Determine the wet/dry balance (0% = dry only; 50% = equal mix; 100% = wet only).
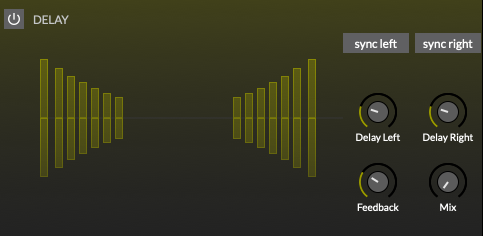
Delay
Stereo delay with feedback and independent channel delay times.
-
Enable: Bypass the effect on and off.
-
Sync Left: Turn on to synchronize left channel delay rate with the host tempo.
-
Delay Left: Set the left channel delay time in msec when the Sync button is off, or in beats when the Sync button is on. See Sync button parameter below.
-
Sync Right: Turn on to synchronize right channel delay rate with the host tempo.
-
Delay Right: Set the right channel delay time in msec when the Sync button is off, or in beats when the Sync button is on. See Sync button parameter below.
-
Feedback: Determine the amount of delayed signal fed back to the input of the delay.
-
Mix: Determine the wet/dry balance (0% = dry only; 50% = equal mix; 100% = wet only).
Reverb
-
Enable: Bypass the effect on and off.
-
Type: Select the type of reverb processor.
Plate reverb
Plate reverb with a vintage character.
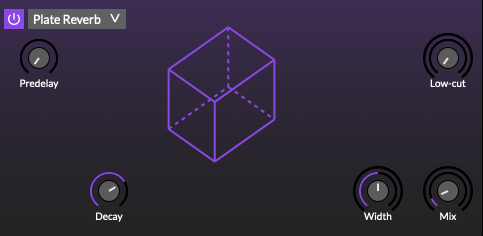
-
Predelay: Set the amount of initial delay before diffuse reflections begin.
-
Decay: Set the decay time of the gated reverb tail. Larger values equal longer reverb times.
-
Low-cut: Determine the amount of high frequency loss in the reflections.
-
Width: Determine how much reflections are spread across the stereo field.
-
Mix: Determine the wet/dry balance (0% = dry only; 50% = equal mix; 100% = wet only).
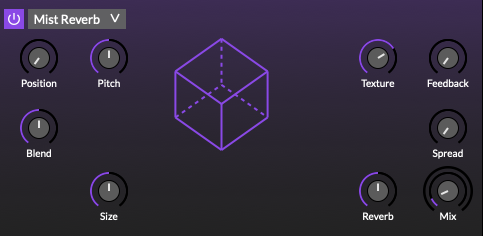
Mist reverb
Granular audio processor that creates textures and soundscapes by combining multiple overlapping, delayed, transposed and enveloped segments of sound taken from the input.
Based on the Mutable Instruments Clouds Eurorack module.
-
Position: Selects from which part of the input the audio grains are played.
-
Pitch: Adjust the grain pitch. At 12 o’clock the buffer is played at its original frequency.
-
Blend: Granular dry/wet balance.
-
Size: Adjust the grain size.
-
Texture: Morphs through various shapes of grain envelopes: square (boxcar), triangle, and then Hann window. Past 2 o’clock, activates a diffuser which smears transients.
-
Feedback: Feedback amount.
-
Spread: Stereo spread, the amount of random panning/balance applied to the grains.
-
Reverb: Reverberation amount.
-
Mix: Determine the wet/dry balance (0% = dry only; 50% = equal mix; 100% = wet only).
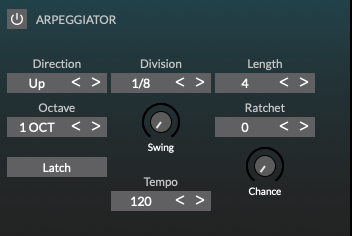
Arpeggiator
MorphWiz Studio features a flexible and powerful arpeggiator. The arpgeggiator rack is shown when FX is selected on the Parameter menu and ARP is selected on the sub-section menu.
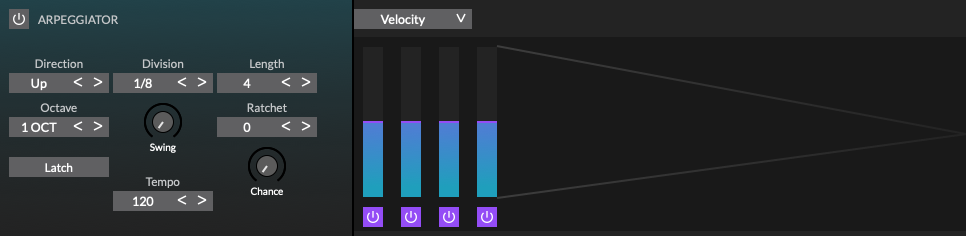
The arpeggiator subpage consists of two main sections:
-
Basic arpeggiator controls: These buttons and knobs determine the basic behavior of the arpeggiator.
-
Arpeggiator sequencer controls: These buttons, pop-up menus, and knobs let you edit one or more arpeggiator sequencers.
Basic arpeggiator controls
The basic arpeggiator controls consist of several buttons, menus, and knobs.
-
Enable: Turn the arpgeggiator on and off. When active, the aprgeggiator responds to incoming MIDI notes.
-
Direction: Determine the order in which incoming notes are organized into a pattern, form the following choices:
-
Up: Plays the current notes from lowest to highest.
-
Down: Plays the current notes from highest to lowest.
-
Up/Down: Plays the current notes from lowest to highest and back again.
-
Down/Up: Plays the current notes from highest to lowest and back again.
-
Played: Plays the current notes in the order they were originally played.
-
Random: Plays the current notes in a random, non-repeating order.
-
-
Division: The time between each arpeggiated note.
-
Length: Set the length of each arpeggiated note.
-
Octave: Determine if the arpeggiator pattern is played only at its original pitch or across higher octaves when the pattern is repeated.
-
Swing: Change the timing of the arpeggiator, moving even-numbered steps to later positions without changing the timing of odd-numbered steps. This can add a more relaxed feel or groove to the part. Swing generally works best when combined with a Rate knob setting of 1/4 of a beat (16th note swing feel) or a Rate knob setting of 1/2 a beat (8th note swing).
-
Ratchet: The number of subdivisions of a note added to an arpeggiated note.
-
Chance: Set the probability that an arpeggiated will be ratcheted.
-
Latch: Hold the arpeggiator pattern when you lift your hands from the keyboard. Set to Off to stop the arpeggiator pattern when you lift your hands.
-
Tempo: Set the global tempo.
Arpeggiator sequencer
The arpeggiator sequencer section is similar in functionality to a step sequencer. Each bar represents a step. A step may be active or in-active, and used to modulate synthesizer parameters via the modulation matrix.
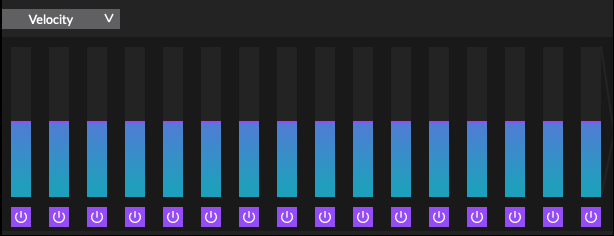
-
Target pop-up menu: Choose the parameter to view and edit.
-
Velocity: Set the velocity of the note generated by the arpeggiator
-
Tune: Determines the tuning offsets for each step in semitones.
-
Duration: Set the note length for each step.
-
Mod Wheel CC1: Modulate the Mod Wheel source in the modulation matrix.
-
Slide CC74: Modulate the Slide source in the modulation matrix.
-
Expr :Modulate the Expr source in the modulation matrix.
-
-
Step Value bar: Drag the bar up and down to change the value of the selected target parameter.
-
Step Enable: Enable or disable the step.
Playing surface
Standalone app only
The isomorphic playing surface is the area that contains the notes and expression input to the synthesizer, and is where you play the instrument. It occupies the bottom section of the user interface.
The notes are arranged similarly to a stringed instrument, for example, a guitar. Each note occupies the vertical column (or fret) with lower pitch on the left, higher pitch on the right.
Horizontally, each row of notes represents a string, with the lowest pitch in the bottom left and the highest in the top right. There are a maximum of six strings. Notes are arranged in 4ths.
The playing surface is fretless in that it is possible to seamlessly slide the pitch of the a note, as you would by sliding along a guitar string. The accuracy of the note selection can be adjusted such that the initial touch is rounded to the nearest note. By adjusting this accuracy the instrument can become fully fretless in the same way that a violin is fretless. The pitch of the note is then dependent upon the skill of the musician.
In addition, sliding vertically up and down along the fret column can adjust the timbre of the note via the morphing synthesizer engine.
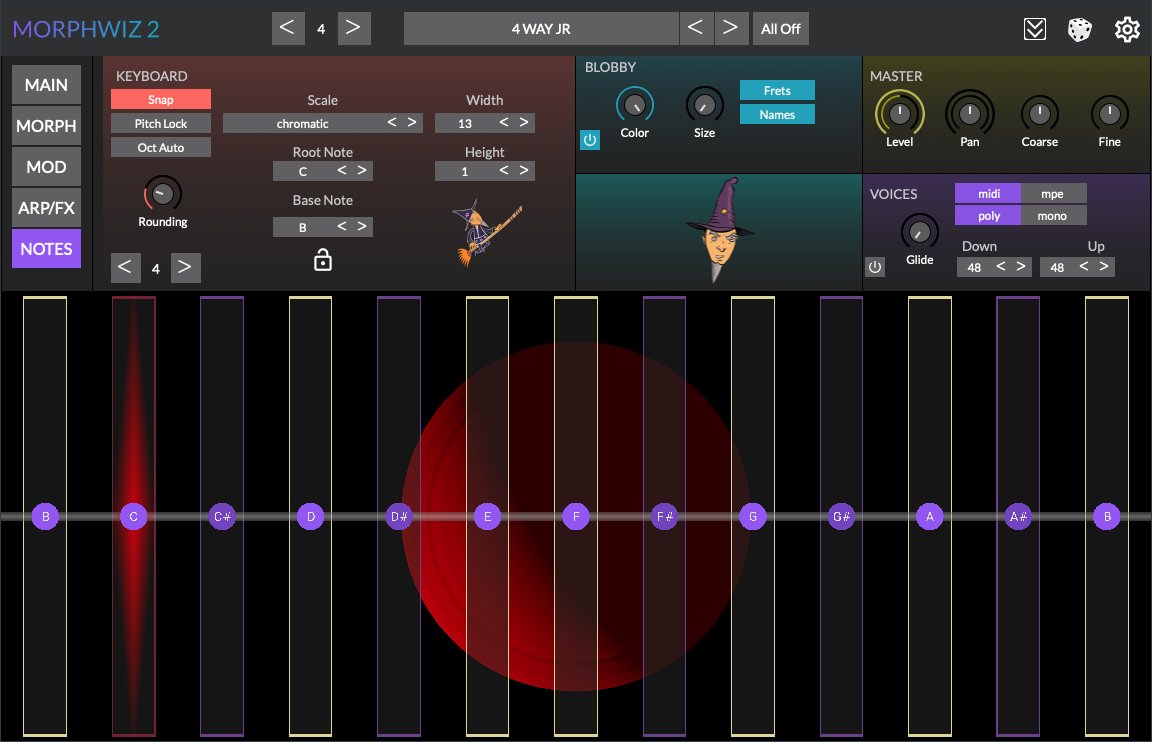
Playing surface parameters
The playing surface parameters are shown when NOTES is selected on the Parameter menu.
-
Snap: The touch point on the surface snaps to the nearest note (fret). Turning this off allows you to play with variable pitch intonation.
-
Pitch Lock: With this enabled, pitch slides are locked to the next note rather than smooth slide in pitch.
-
Oct Auto: Adjusts the octave of the playing surface as you play notes. Four notes between the root and the fifth are required to increase or decrease the octave, For example, playing the sequence of notes G, D, C#, C will decrease the octave. While playing the sequence C, C# D, G will increase the octave. In other words four notes are required: root, any two, and fifth.
-
Rounding: Adjusts the accuracy fret detection when the surface is touched.
-
Octave: Adjusts the current octave down/up.
-
Scale: Select the layout of the notes based on the scale.
-
Root Note: Select the root note, indicated in red glow.
-
Base Note: Set the first note, in the bottom left corner.
-
Padlock: Lock the playing surface layout between preset changes. The playing surface layout is saved with the preset.
-
Width: Adjust the number of notes shown Horizontally (along the string).
-
Height: Adjust the number of rows (or strings), up to a maximum of six.
Loop Player
Standalone app only
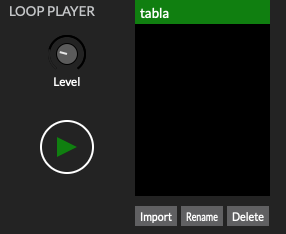
The Loop Player allows you to play backing tracks. These will loop indefinitely until stopped. These audio loops can be used as accompaniment while you perform with the main synthesizer.
-
Level: Adjust the output volume of the loop.
-
Start/Stop: Start or stop the loop.
-
Import: Import an audio file (e.g MP3) and save it into the local list. Most popular files types are supported such as WAV, AIFF, MP3, Ogg, FLAC, and AAC.
-
Rename: Rename an audio file.
-
Delete: To delete an audio file.